
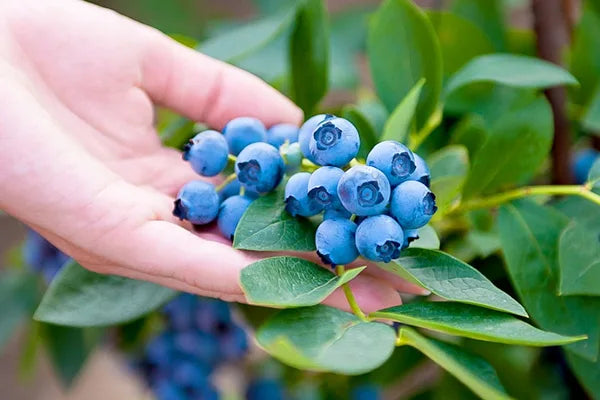
How to Grow Blueberries
Blueberry plants require acidic soil, pH 5.5 or below, that is moist yet free draining, with lots of rich organic matter.
As members of the heather family, they hate lime and chalk, and will die slowly if you plant them in those soils!
Your local soil pH is down to chance.
A cheap pH testing kit, sold at any garden centre, will tell you what you have: asking a neighbour who gardens works too.
- If you happen to have soil with the right pH naturally, that’s great.
- If it is a tad too high, between pH 5.5 and 7.0, you replace the soil to a depth of 3 feet with acidic peat, ericaceous compost, and some leaf mould and/or old woodchips (which are nutritious, spongy, and mildly acidic as they decompose).
- If your pH is over 7.0, don’t bother trying to change it. Grow your blueberries in pots (see below).
Growing Blueberries in Pots & Containers
If your garden is on alkaline ground (over pH 7.0), typically where chalk or sandstone are prevalent, then you should grow your blueberries in containers.
Blueberries have good ornamental value, with profuse flowers and beautiful autumn colour. Plant them in barrels, tubs or large pots to give them room to grow (a mature blueberry plant in open ground can easily reach over 6 feet) and prevent them from drying out easily. Small pots will work, but they give small plants that need constant watering.
Always use an acidic (ericaceous) compost: many garden centres sell potting mixes specifically for blueberries, and they will do well in pure moss peat.
Water the plants with rainwater if possible, as it is more acidic than tap water, but the important thing is to not allow them to dry out – you can’t realistically water potted blueberries too much! In a really hot summer, if your plants are in full sun and the pot is not well insulated from the heat, you may need to water them twice a day.
A saucer under the pot will make your life easier, and it will reduce the amount of nutrients that get flushed away. In winter, however, you must remember to remove the saucer to stop the pot getting waterlogged.
When pot grown blueberries are in full growth, feed them with an ericaceous plant feed every 3 weeks or so – remember that “normal” plant food is bad for them.
As your blueberries grow larger, they may need potting on into bigger containers at the end of autumn, or in early spring.
Remember to net your plants as soon as the flowers start to fade, otherwise the birds will get the fruit first.
Planting Several Blueberries in one Container
It’s easy to grow blueberries in containers as long as they get consistent moisture: if they dry out, they won’t fruit.
Our video will show you how to pot-up three blueberry bushes together, you can do more or fewer depending on the side of your container.
The plan is prune them on a stick regime to help control their size: after a stem crops for the second time, we’ll prune it out.
You will need a large pot, your blueberry bushes, acidic potting compost and water.
TRANSCRIPT
Planting Blueberries In Open Soil
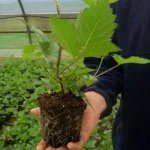
On arrival, soak your potted blueberry plants in rainwater for half an hour. Plant immediately if possible, but if you can’t then stand the blueberry plants in a sheltered place outdoors, with lots of light and where the roots won’t freeze. Water with rainwater as necessary.
Choose a sheltered planting site, ideally in full sun, although they still fruit well in light shade.
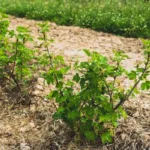
Prepare the ground really well, thoroughly removing perennial weeds; it’s worth doing all this in well advance so the toughest weeds have a chance to grow back and then get removed for good.
Make a good-sized, square hole about 90cm across for each plant, mixing the topsoil you take out with an equal or greater amount of acid (ericaceous) peat moss. If drainage is suspect, improve it with acidic sharp sand or grit, and seasoned woodchips (fresh woodchips rob nitrogen as they decay).
Space your plants 150cm apart. Apply Ericoid Rootgrow, and plant so that they are in the same level in the soil as they were in the pot, with the crown of the plant just under the soil level. Fill the hole with the peat/soil planting mixture and tread around the plants using the ball of your foot to firm them in. Water well with rainwater, and finish off by mulching with moss peat or shredded bark.
Keep blueberries well watered and weeded – they suffer badly if they dry out. Rainwater is always best, but tap water is better than nothing. Keep the plants well weeded.
Top Tip: Blueberries crop with increasing vigour and produce more fruit in the long term if they are not allowed to fruit in the year after planting. Rub out fruit buds (the fat ones) in the first winter. This is optional, but really pays off.
Fertilising: Remember to never add anything with lime, which includes wood ash. Each March, give your plants a boost with a compound fertiliser for acid-loving plants (follow the instructions) – blueberry specific ones are great, but if you have fertiliser for other ericaceous plants like Azaleas, Rhododendrons or Heather, those are fine too.
If your plants did not grow well the year before (less than 30cm), apply 1/2 oz per square yard (that’s 17g per square metre) of sulphate of ammonia. After the chemicals, give them a good mulch of peat or bark when the ground is still wet.
Harvesting: Blueberries are ripe when they are a bluish-black where the fruit meets the stalk, with a waxy, white bloom. They will come off the with a gentle pull, and are soft when squeezed. They ripen over a period of a few weeks, up to two-month season with a variety like Chandler.
Blueberries don’t store well: two, maybe three weeks in the fridge. Freezing keeps the goodness, but loses the best part of the flavour.
Prune Blueberries to Remove Ageing Wood
- Blueberries start cropping on last year’s wood, and two-year wood crops best.
- By its third, maybe fourth year, a stem should be pruned down to its base: the berries will be small, held on increasingly weak, spindly shoots that crowd each other.
- Blueberry bark shows its age clearly, so it is easy to see old wood and prune it off mature bushes.
- The fruit buds are big, oval and stick out from the stem. Leaf buds are small, and hug the stem.
The best time to prune is February or March, but as usual cut out any damaged, diseased or rubbing branches whenever you spot them.
Every Autumn, prune off low, horizontal branches that are close to lying on the ground, and suckers spreading out from the roots.
- In years one and two, you are only trying to shape a bush with the classic open-centred “goblet” shape, so pruning will be limited to removing ingrowing stems. If your plants fail to branch out much in their first year, then cut back the longest stems by a third, above an outward facing shoot.
- In their third year, select about one-in-four or one-in-five of the oldest, thickest, barest stems to cut right back. If they are in the centre, cut them down to the ground; if they are at the edge of the bush, then prune above a strong, outward facing sideshoot.
- In their fourth year onwards, remove most of the two-year-old wood (i.e. wood that has cropped twice) – it’s fine to leave a couple of the best older stems for one more year and only trim off their straggly, weakest side shoots with few if any flower buds.
The broad objective is to maintain an open centred mature bush, clean around the base, that only has a little 3-year-old wood, and roughly equal amounts of 1 and 2-year-old wood.
Prevent over cropping: When your plants are young, it is possible for strong two-year-old young stems to have too many flower buds on their side-shoots; a common result is that the entire crop goes down in quality as all the fruit are smaller than they would be if there are less of them.
This is an art, and you will learn what works best for your plants in your location – it is not always necessary, but sometimes less really is more, and thinning the crop on your young plants helps them grow to a mature size sooner.
Check stems in the winter after they first flower (i.e. they are now branched, and heading into their second, peak year of productivity) and head cut back the biggest stems, with the most fruit buds, to an outward facing sideshoot, so that 30-40% of the fruit buds on the pruned stem are removed.
You will probably need a bird net
Birds love the fruit, and some pick off the fruit buds.


Leave a Reply