
Contents
How to Plant Clematis in Open Ground
Clematis will grow well practically anywhere if you give them five things: soil preparation, correct planting depth, adequate water, cool conditions for the roots, and the first prune.
Soil Preparation for Clematis
Clematis demand good drainage and do well on chalky or sandstone soils, where the ground retains moisture but never puddles. They love lime and alkaline soils.
Where drainage is bad and without “flood relief,” your clematis will suffer and many will die. So on heavy clay, the trick is to plant them into a mound a few inches taller than the pot and a good bit wider. Make it up with decent soil and a bit of compost. By definition it will drain. Once established, clematis roots will worm their way in to the clay and your plant will have a really good chance of survival.
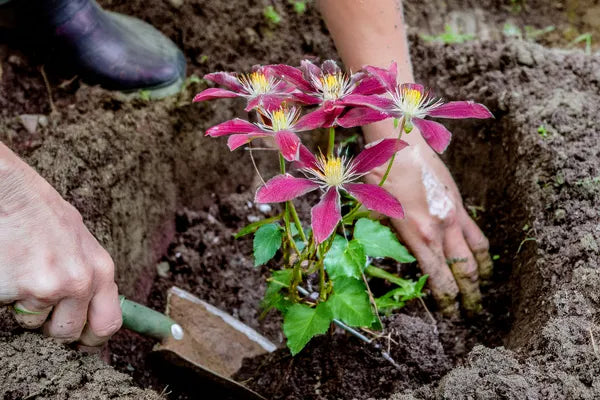
- On friendlier soils, dig a decent hole, about twice the width of the pot; half as deep again is plenty.
- Remove all roots, weeds, stones, and other rubbish, and improve the soil with well-rotted manure or compost.
- Use either rootgrow or bonemeal when planting, but not both.
- Pinch off any leaves that will be buried when planting is finished.
- Water the plant well and remove it from its pot.
- Without breaking any, carefully tease out a few roots to help them out of the rootball and into the surrounding soil.
How Deep to Plant Clematis
How deep to plant depends on the pruning group. Sounds silly, but it is true and is worth getting right.
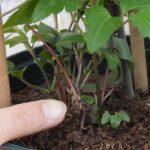
Group 1 clematis (including armandii, cirrhosa, and the alpina and macropetala types) should be planted so that the soil level in the pot corresponds to the soil level in the ground. Burying the crown deeper than that risks crown rot, most common in armandii and cirrhosa. Montana is a partial exception: it does not mind being planted a few centimetres deeper, and a modest extra covering of soil does it no harm.
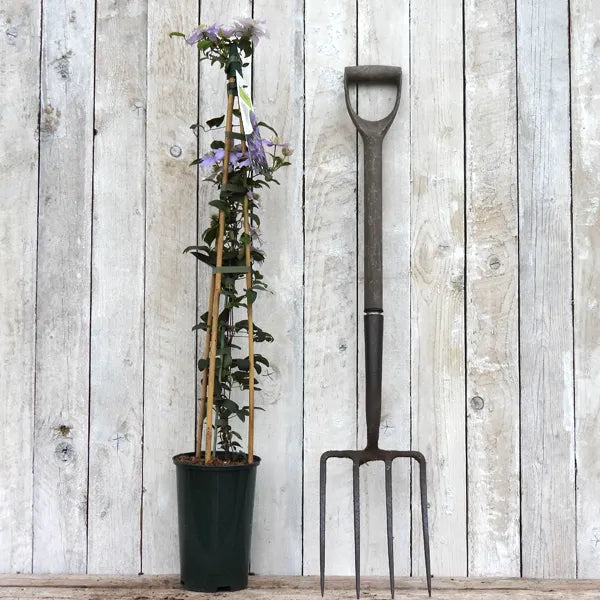
All other clematis benefit from deep planting. For plants in 2-litre or 3-litre pots, the crown should sit at least 8–10cm (3–4″) below soil level. A larger specimen with a strong, woody stem can go down to about 15cm (6″). The point is to bury at least one node of a woody stem. Full detail is in our clematis planting depth guide.
For clematis in 9cm pots, read our P9 pot guide first. Place these younger plants at least 8–10cm deep, but do not return the soil all the way up over the stem until it becomes woodier, usually in the autumn after planting.
Planting deep promotes vigorous growth from below soil level, reduces the risk of disease, and helps the plant establish quickly.
Watering Newly Planted Clematis
Until a clematis has begun to grow away well, it needs plenty of water. Clematis are thirsty plants. They come in “deep” pots which are much taller than they are wide, so their roots can easily be 20–30cm below soil level. A light sprinkle just won’t cut it. When we water newly planted varieties we typically do it with a watering cane and rose. Water until there is a proper puddle. Put the can down, go and do something else and come back in a quarter of an hour. Rinse and repeat twice (three waterings in all). If in doubt, inspect the soil down to about 8cm (3″): if it is dry to the touch, it is time to water.
Keeping Clematis Roots Cool and Moist
Clematis love the sun on their stems above ground, but their roots hate dry soil.
You may have heard that clematis like their root zone to be shaded and cool. The heat itself is not the problem; hot soil dries out quickly without irrigation, and that is what damages the plant. Young clematis growing out on our nursery hardstanding, in plastic pots exposed to full sun, have a drip irrigation system to keep them moist. The pots get pretty hot in summer, but never dry and the plants look fantastic.
Traditionally a flagstone was used to shade the soil above the root zone. At least one TV gardener advises against this because it harbours pests. As the editor of everything “gardening” on this site, I disagree. A flat stone warmed by the sun is a wonderful habitat and having places where slugs congregate makes them easy to collect without needing a torch.
If you don’t do slabs, then shallow-rooted ground cover to shade the soil: ornamental grasses, small shrubs such as hebes, ferns, or sedum. Planting ground cover over the root zone has the bonus of covering what Christopher Lloyd described as a clematis’s bad legs (which are more of an issue with mature plants). You can also simply mulch a bit more generously with organic matter. Avoid mulching directly over the crown and stems; start a few inches away, as you would with most woody plants.
Such is gardening: there are many roads home.
Feeding Clematis
For maximum performance, feed clematis in the ground from early spring until the first flower buds appear, using a balanced liquid fertiliser with similar amounts of nitrogen (N) and potash (K). All fertilisers list their makeup on the label; use any with close to equal parts of both. Fortnightly is enough. Stop feeding once buds form and don’t start again until flowering has completely finished. If flowering continues into early autumn, which happens more often these days, just wait until the following spring. Late-season feeding encourages soft growth that will be cut back by frost. In spring a mulch of well-rotted manure or garden compost works wonders.
Pruning Clematis After Planting
It is tempting to plant your new, leggy clematis and let it get on with it. In fact, all newly planted clematis, regardless of pruning group, benefit from being cut back to just above a leaf node no more than 30cm (12″) off the ground. Lower is better: 15cm (6″) if you can bear it.
This first prune encourages the plant to sprout from the base, giving you a much bushier, healthier plant. If you forget, let it flower, and then cut it back hard any time before the following November.
After this first prune, follow the pruning instructions for your group. For the full rules for each group, with diagrams showing where to cut, see our dedicated clematis pruning groups guide.
When to Plant Your Clematis
Ashridge clematis are container-grown, which means they can go in at any time of year as long as the ground is workable: not frozen solid, not waterlogged. Otherwise, you are good.
But some times are better than others and the two best windows are autumn and spring. Autumn planting works well because the soil is still warm from summer, roots establish over winter, and rainfall does much of the watering for you. Spring planting suits most gardeners’ instincts and the plants take off quickly once in the ground. Summer planting is perfectly workable but consistent watering is important. In winter, it’s probably the least ideal, as your dormant plant(s) will sit in cold, wet ground for several months.
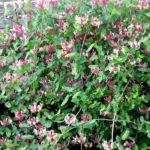
Clematis Montana
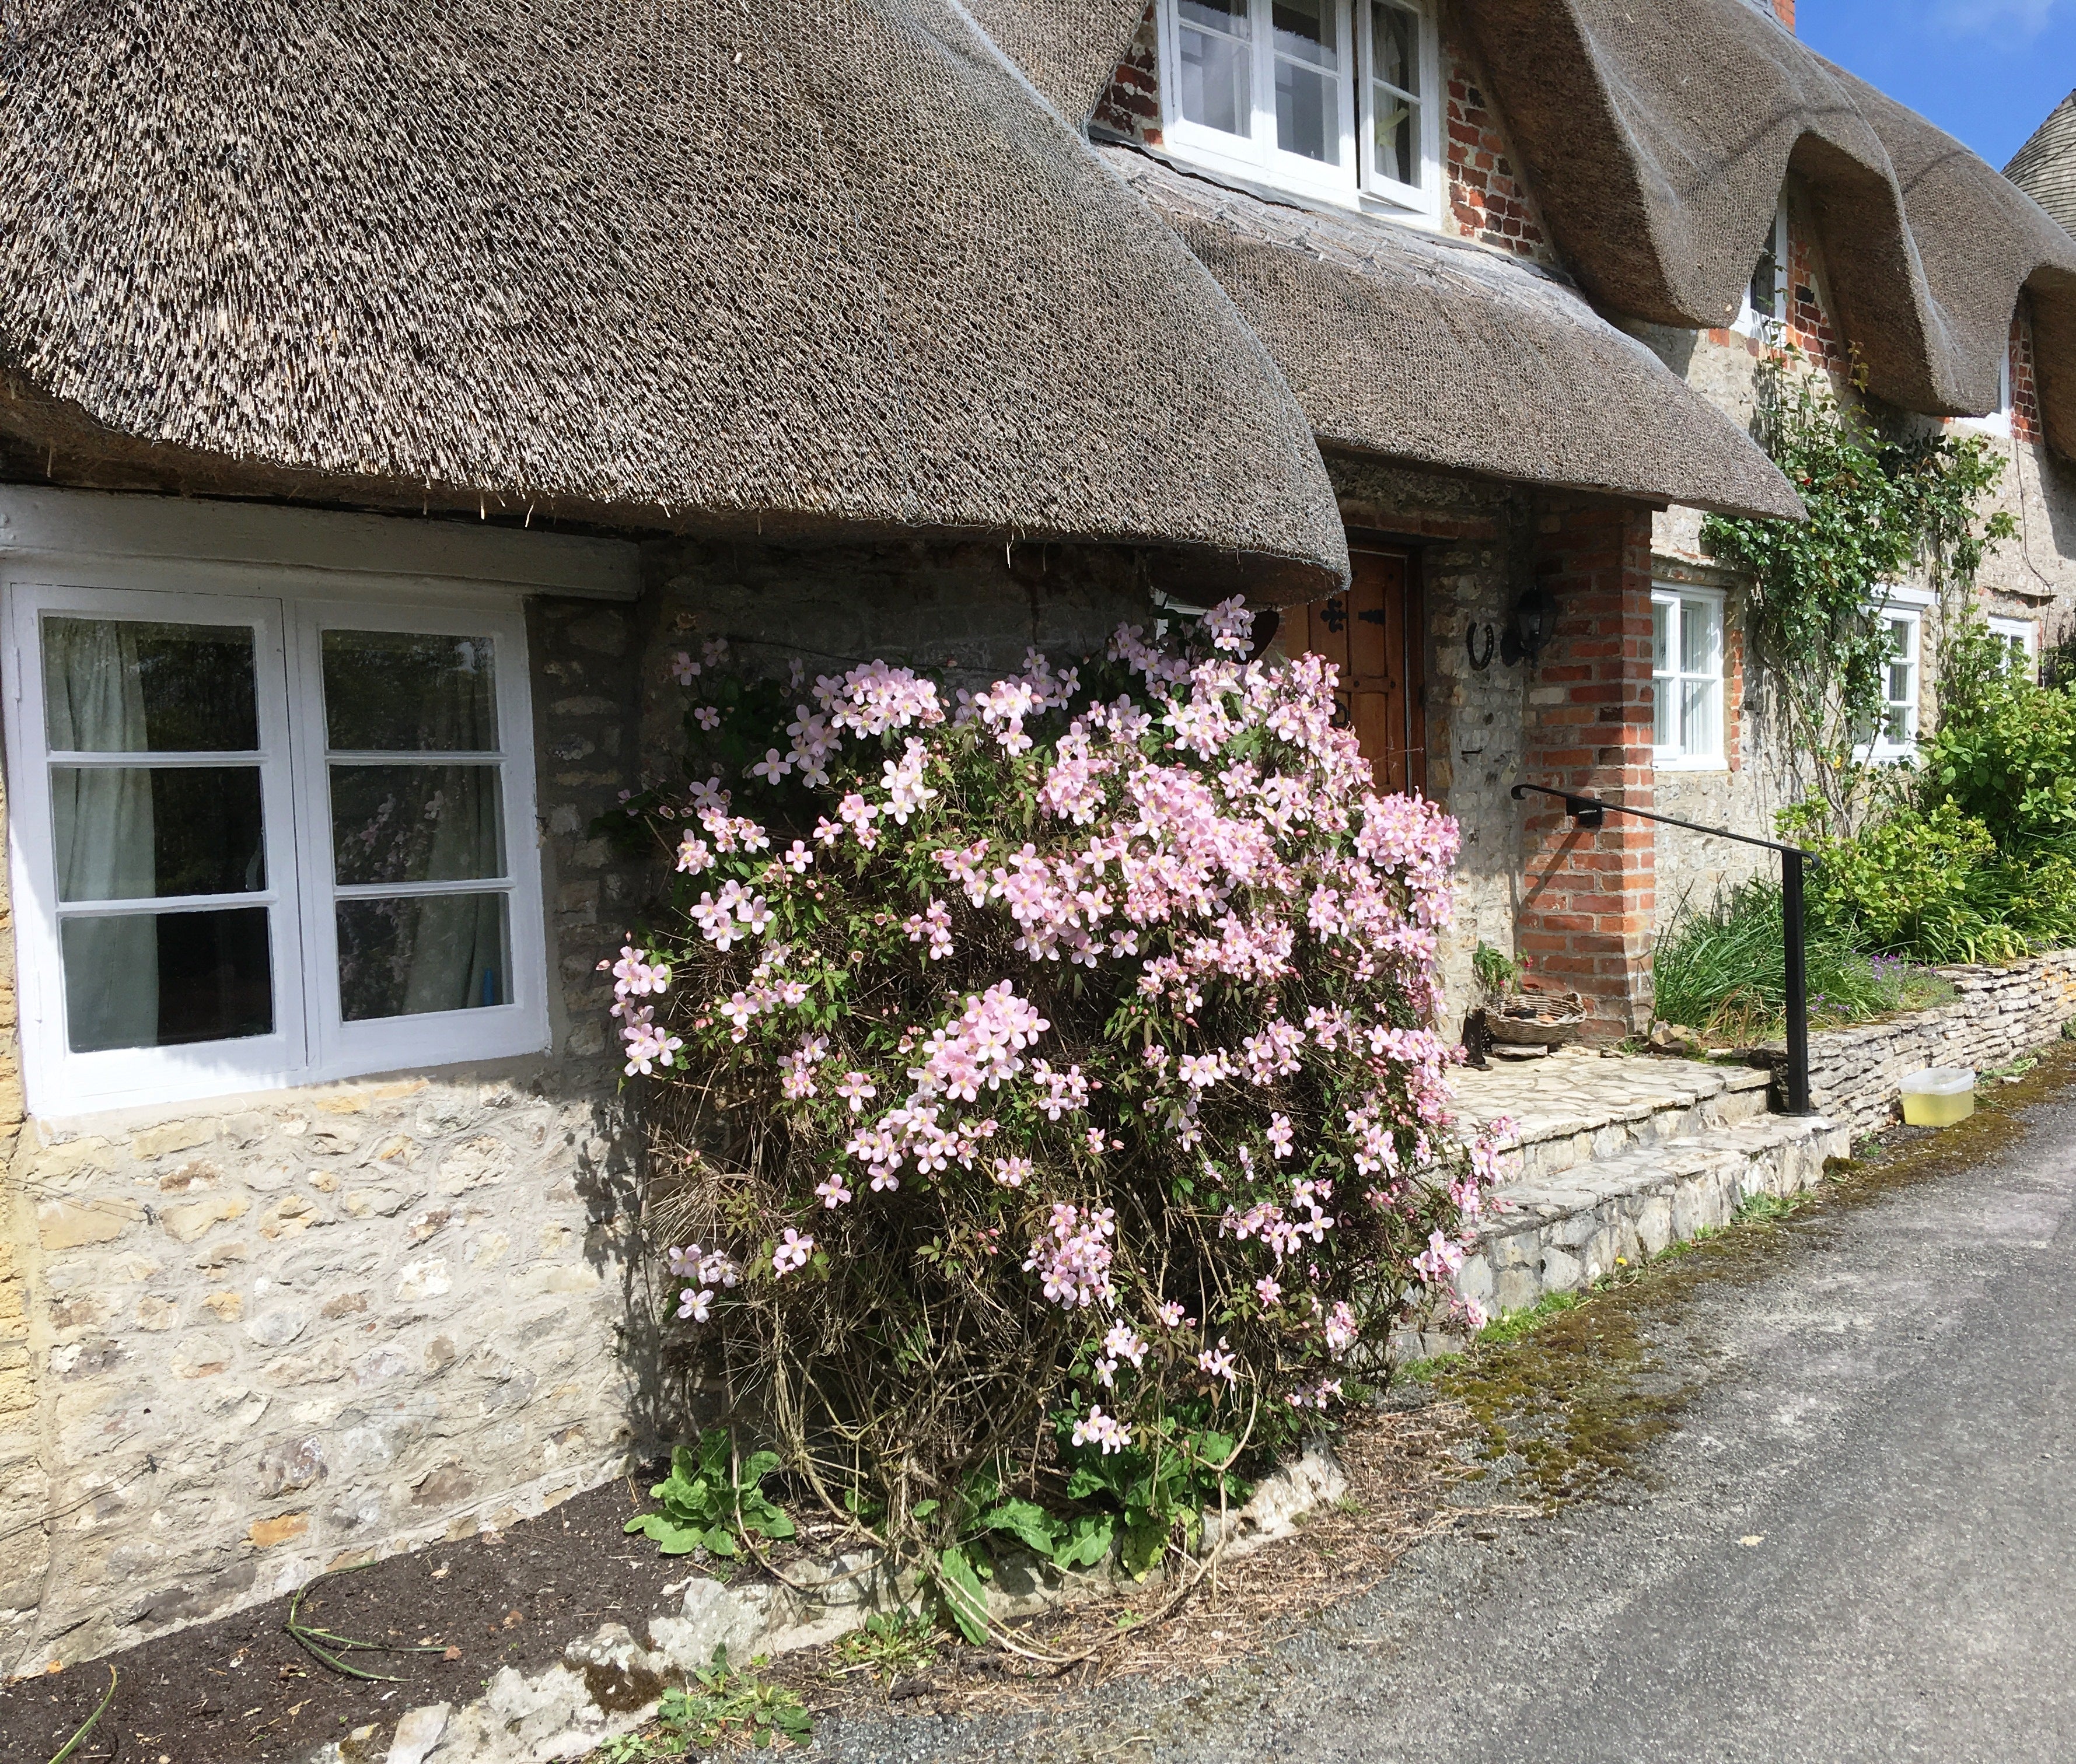
Clematis montana is the most vigorous climbing plant in the Ashridge range. A single established plant can cover the gable end of a house, swamp a large tree, or billow along the top of a garden wall for ten or fifteen metres. The flowers are small by clematis standards: four-petalled, in white or shades of pink, coming in dense clusters that smother the plant completely in April and May. In scented varieties, the fragrance carries across the garden.
Ashridge stocks fifteen montana varieties. Five hold RHS Awards of Garden Merit: Elizabeth, Broughton Star, Mayleen, Tetrarose, and Grandiflora.
Growing Clematis Montana
Montana is tough and unfussy. It grows in sun or semi-shade and is fully hardy throughout the British Isles; the only sites that give it trouble are exposed positions where very hard winters knock it back. It will grow in ordinary garden soil without much persuasion.
One point that surprises most growers: unlike other Group 1 clematis, montana tolerates and benefits from being planted deeper than pot level. Set the crown 8–10cm (3–4″) below soil level; it produces roots readily from buried stems and establishes more vigorously as a result. This is the opposite of the advice for armandii and cirrhosa, which should be planted at pot level.
Plan the structure before you plant. Montana needs something proportionate to its ambitions: a large pergola, the side of a building, a section of stout wire fence, or a mature tree with strong, well-spaced branches. A small fence will not hold a mature Mayleen. The plant will not stop growing at a polite height, so give it a framework it can fill without immediately overpowering, and accept that keeping it in bounds will be an annual task.
Pruning Clematis Montana
Montana flowers on wood made the previous year. The rule is the same as all Group 1 clematis: prune immediately after flowering, in late May or early June, and prune only what you need to. Cut out the stems that have grown where you do not want them. You will not lose next year’s flowers, because the plant spends the rest of the summer producing new wood that will carry them.
Montana is more forgiving of hard cutting than other Group 1 types. If it has got properly out of hand, you can cut back firmly in June; it may not flower the following year, but it will recover strongly. Spread structural reductions over two or three years where possible. Do not prune montana in autumn or winter: you will remove all the following season’s buds.
Is Clematis Montana Evergreen?
No. Montanas are deciduous: they lose their leaves in autumn and are bare in winter. Some gardeners find the dormant plant unappealing, but there is a practical benefit: you can see the stem structure clearly in winter and remove any dead wood before growth starts in spring. You can also see what’s been nesting there. The flowers more than compensate for six months of bare stems.
Growing Clematis in Shade and on North-Facing Walls
Most clematis tolerate partial shade well, and a few actively prefer it. The general principle is they need some sun on their flowers to bloom freely, but they cope on east-facing or lightly shaded aspects without much complaint.
North-facing walls are more challenging but far from impossible. Group 2 large-flowered clematis, in particular, do well on north and east aspects, and the reduced light actually improves their colour. Nelly Moser is the best-known example: its distinctive bar holds much better out of strong direct sun, where the contrast between bar and petal stays vivid. In full sun, the bar bleaches within days. Bees’ Jubilee behaves similarly.
For a fuller list of which climbers work best on north and shaded walls, see our guide to climbing plants for shade and north-facing walls.
Clematis Wilt and Common Problems
Clematis wilt is a fungal disease caused by Phoma clematidina. It is, by some margin, the most alarming thing that can happen to a clematis. Stems collapse and blacken suddenly, usually in late spring or early summer, without obvious warning. If you have not seen it before, the plant can appear to have died almost overnight.
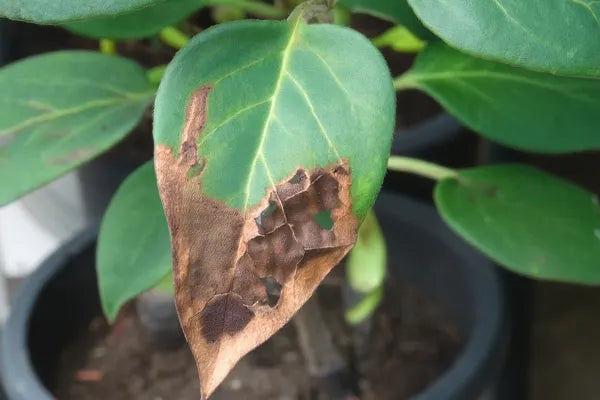
If your clematis wilts, cut the affected stems back hard, down to healthy tissue or, if necessary, to ground level. Bag and bin or burn the cut material rather than composting it. Then wait. Most clematis will regrow from the base; so do not assume the plant is dead. New shoots will appear from below soil level, sometimes within a few weeks. A well-established plant will come back as if nothing happened.
Deep planting significantly reduces the risk by keeping dormant buds well below soil level, which is one of the strongest arguments for planting Group 2 and Group 3 clematis at least 8–10cm deep. Avoid overhead watering, keep the root zone consistently moist, and do not overfeed with high-nitrogen fertilisers, which produce soft growth prone to infection. Once a plant has grown through two seasons without incident, wilt becomes much less of a concern. Clematis are also much less prone to wilt on alkaline soils in our experience.
Two other problems worth knowing about:
- Slugs: They go for newly emerging shoots at ground level in spring, most often on young plants. Check under the paving or ground cover around the crown on mild evenings in March and April.
- Powdery mildew: A surface coating of white powder on the leaves, most common on Group 2 large-flowered clematis in dry summers. It rarely kills a plant but looks poor and can weaken growth. The cause is dry soil combined with warm air; consistent watering at the root reduces incidence considerably.
When and How to Prune Clematis
Every clematis belongs to one of three pruning groups. The group number is the key to when to prune, how much to remove, and whether you need to do anything at all in a given year.
Group 1 — montanas, armandii, cirrhosa, alpinas — flower on wood made the previous year. Prune lightly, if at all, immediately after flowering in spring. Group 2 — the early large-flowered hybrids such as Nelly Moser — produce their main display in May and June on last year’s wood, then often repeat on new growth in late summer; prune gently in late February down to the first pair of strong buds. Group 3 — viticellas, late large-flowered hybrids, tangutica — flower entirely on the current year’s growth and are cut hard to low buds in February; they reward severity.
For timing, technique, and diagrams showing exactly where to cut for each group, see our complete guide to clematis pruning groups, which also lists every variety in the Ashridge range by group.
How to Grow Clematis in Pots and Containers
Growing clematis in a large pot is the obvious solution on terraces, patios, and balconies, and where poor drainage or a high water table makes the soil unsuitable. Clematis demand good drainage, so they are generally happy in pots. The two things they will not tolerate are drying out and roots overheating in summer.
Best Clematis for Growing in Pots
Any clematis can grow in a suitable container, but the easiest to manage are in pruning group 3. They flower on the current year’s growth and are pruned back to 30–45cm (12–18″) above soil level each year in late winter. This means their supports can be repaired and the plant moved around as necessary; that is not really practical with a giant Mayleen Montana.
Compact varieties under about 2.5m can be supported by a sturdy wigwam of tall canes tied around the outside of the pot, as long as the pot itself is not going to topple over. White Prince Charles and Hagley Hybrid are good starting points. Also worth considering are the Boulevard and Tudor Patio series, which grow more like compact shrubs than climbers; Parisienne and Sally are both excellent in pots.
Choosing a Container for Clematis
To shield the roots from heat, choose materials that conduct warmth slowly: thick pottery, stone, wood, or thick insulated plastic are much better than metal or cheap thin plastic. There are some fantastic double-walled terracotta look-alike plastic pots that look like the real thing at a fraction of the weight and cost. Light, reflective colours are better than dark ones. Keep the container in shade if you can; positioning it at the north side of other pots helps considerably.
Drainage for Container-Grown Clematis
Most containers have adequate drainage, but often the prettier the pot, the fewer holes it has. If the material is workable, enlarge or drill extra holes; if it is not, do not use it. The container should be held just off the ground so the drainage holes cannot get blocked. Do not put gravel into the bottom of the pot: it is a myth that this helps drainage.
Container Size for Clematis
Clematis have large, greedy roots that need room. Smaller varieties will survive in a small pot, but flowering will be poor and they will become disease-prone over time. The minimum container size is at least 40cm (15″) wide and 45cm (18″) deep at their smallest dimension. If the pot is narrower at the base than at the top, measure the width at the base.
Compost for Container-Grown Clematis
Peat-based composts are not recommended for clematis. They are hard to re-wet once dry and have virtually no nutrient content. Garden soil performs poorly in pots too, draining badly and drying in unpredictable patches. There is no substitute for a loam-based John Innes Multipurpose compost: easy to water, with excellent drainage and all the slow-release nutrients these plants need. If you intend your clematis to stay in the pot for several years, use John Innes No. 3.
Supporting Container-Grown Clematis
Clematis carry a lot of foliage. If the support is not strong and well anchored, it will break in the wind and damage your plant. Canes inside the container wave in the breeze, disturbing roots by causing wind rock; fixing supports firmly to the outside of the pot is harder but much better. The best solutions are the same as for clematis in the ground: a sunny wall or fence to train them over, or a shrub or small tree to scramble through, which casts dappled shade on the roots as a bonus.
Feeding and Watering Container Clematis
Consistent watering through the growing season is vital: a clematis that dries out may never forgive you. Two or three times a week is enough in the hottest, driest summers; watering every day is not necessary and can cause its own problems.
Feed while you water, every fortnight, with a liquid feed containing similar parts of nitrogen (N) and potash (K). Start feeding as the plant breaks into growth and stop as soon as you see a flower bud. Do not feed again until flowering has stopped. If flowering continues into early autumn, that means wait until the following spring. Too much feed late in the season encourages soft growth, which will be cut back by frost.
Frequently Asked Questions
What are the three clematis pruning groups?
Group 1 clematis (armandii, cirrhosa, montana, alpina, and macropetala types) flower on last year’s wood and should be pruned lightly, if at all, immediately after flowering in spring. Group 2 (early large-flowered hybrids such as Nelly Moser) flower first on last year’s wood in May and June, then again on new growth; prune gently in February or early March, removing only dead and weak stems. Group 3 (late large-flowered hybrids, viticellas, and most species) flower entirely on the current year’s growth and are cut back hard to low buds in February each year. Our guide to clematis pruning groups covers each group with diagrams and variety examples.
When do clematis flower?
It depends on the group. Group 1 clematis, including montana, flower in April and May; armandii and cirrhosa flower in late winter and very early spring. Group 2 large-flowered hybrids give their main display in May and June, with a second flush in late summer and autumn. Group 3 clematis flower from June or July onwards into September and October; some viticellas and species, including Bill Mackenzie tangutica, go well into autumn and carry decorative seedheads into winter.
Do clematis damage walls and fences?
Clematis are not self-clinging and cannot attach themselves directly to a smooth surface. They climb by twisting their leaf stalks around something, so they need a support: wires, trellis, or a host plant. Because they climb through rather than against a surface, they do not damage walls. They do pull at whatever they are trained to, so make sure any trellis or wire fixings are solid. Our guide to climbing plants and wall damage covers this in detail across all climbing plant types.
How do I feed clematis growing in the ground?
Fortnightly with a balanced liquid feed from early spring until flower buds form; stop during flowering; resume once all flowers are finished. See the Feeding clematis section above for full instructions, including fertiliser choice and what to avoid.
Why is my clematis not flowering?
The most common reason is pruning error. Group 1 plants cut back in autumn lose their flower buds for the following year. Group 2 plants cut back too hard lose the older wood on which the first flush depends. Group 3 plants not cut back hard enough produce growth from high on old stems and flower poorly as a result. Other causes: the plant is in its first year and still establishing; the position is too dark; the roots are too dry. A clematis that has never flowered well is nearly always a pruning problem.
How do I support and train clematis?
Clematis climb by twisting their leaf stalks around supports, so they need something to grip: horizontal wires, trellis, canes, or a host plant. On walls and fences, space horizontal wires about 30cm (12″) apart. At planting, push in three or four short canes to guide young stems toward the permanent support. Once a stem reaches the wire or trellis it will take over; in the early weeks it helps to tie them in lightly. Clematis will also scramble happily through shrubs and small trees, which is both the most natural and the most low-maintenance approach.


Leave a Reply